

Is there anything more French than Croissants? When homemade you can also enjoy the wonderful buttery aroma that fills your home while they are baking... you can indulge yourself in warm out of the oven croissants that are flaky, soft, and melt in your mouth... are you craving any yet? Try making your own, you will be amazed at how much better they are than store bought!
 |
| The Daring Bakers go retro this month! Thanks to one of our very talented non-blogging members, Sarah, the Daring Bakers were challenged to make Croissants using a recipe from the Queen of French Cooking, none other than Julia Child! |

I adapted the recipe given minimally, and they resulted the best croissants I have ever made and tried (yes, I have made croissants many times before!). It was very light, with just the right amount of butter and totally flaky, full of air pockets inside.

The recipe calls for only a few ingredients that you normally have at home. It takes time, I admit, if you consider the length of time from start to finish, but the hands-on time is not much. There is a lot of resting time when you can do other things. You can even do a little each day. The resting times in the fridge can also be done overnight.

Click the recipe link below to see the detailed step by step. Sorry I didn't take photos of all the steps, I was too much involved with flour and butter, but I made drawings that I hope you understand :o)
A huge thank you to Sarah for the delicious challenge. I loved making croissants again!
If you would like to see the amazing croissants made by my fellow Daring Bakers, please visit THE DARING KITCHEN where you will also find the original recipe and guidelines for this challenge.
CROISSANTS
(Adapted from "Mastering the Art of French Cooking", by Julia Child and Simone Beck)
4g active dry yeast (1¼ tsp)
3 tbsp (45ml) warm water (not over 38°C or 100°F )
1 tsp sugar
Mix the yeast, warm water, and first teaspoon of sugar in a small bowl. Leave aside for the yeast and sugar to dissolve and the yeast to foam up a little.
Meanwhile, measure out the other ingredients:
1¾ cup bread flour
2 tsp sugar
1 tsp salt
½ cup milk
115g unsalted butter, chilled
1 egg for eggwash
Warm the milk (not over 38°C or 100°F) and dissolve in the salt and remaining sugar.
Place 1 cup of the flour in a bowl and add the yeast mixture and the milk mixture.
Stir with a wooden spoon until well blended.
Add more flour, 1/4 cup at a time, until it begins to get difficult to stir with the spoon.
Sprinkle your counter with some flour and place the dough over the flour.
Knead the dough, adding more flour if necessary, and gradually, until it pulls out of your hand and is no longer sticky. (The amount of flour may vary slightly)
The resulting dough will be smooth, firm, and elastic.
Put the ball of dough back in the bowl (greased with a little oil) and turn the dough to coat it evenly in oil.
Cover the bowl with plastic and leave it to rest at room temperature until tripled in size (from 1 to 3 hours, depending on the room temperature)
Sprinkle some flour on the counter and place the dough.
Roll out the dough into a rectangle (8" X 12" or 20cm X 30cm)

Fold it in three as if folding a letter, like this:

and like this::

Wrap the dough in a plastic bag (not tight) and lay your dough on a tray.
Put it in the fridge for 1½ hours or overnight.
Prepare the butter:
Take the butter out of the fridge and beat it a little with the rolling pin so that it starts to soften but remain cold. A well done croissant should be laminated with both dough and butter chilled at all times!
You can also use a fork or the heels of your hands to soften the butter.
Remove the dough from the fridge to a lightly floured counter. Roll it out forming an 8" X 12" or 20cm X 30cm rectangle.

Spread the softened butter with the help of a spatula, over 2/3 of the dough, leaving a little border without butter so that it is sealed later.

Fold the top 1/3 over the butter.

Then, fold the bottom 1/3 as you would fold a letter. Pinch the edges lightly just to make sure the butter does not escape.
Turn the dough 90° on the counter.
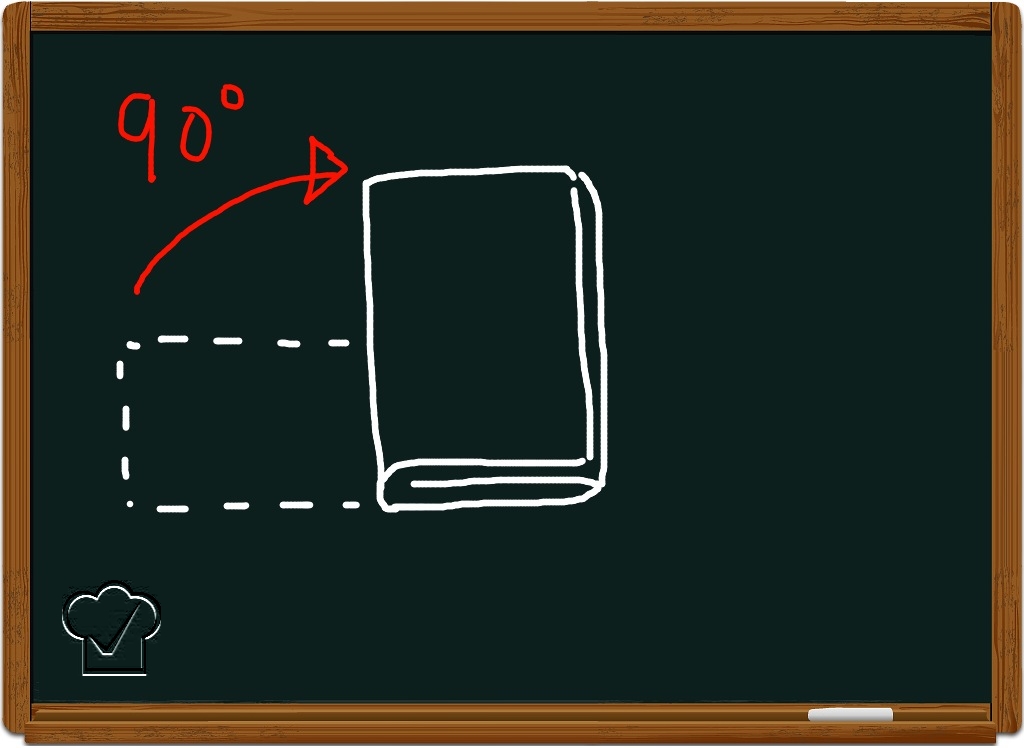
Roll it out again, making an 8" X 12" or 20cm X 30cm rectangle.
Fold again, letter style.
Up to here, you will have given your dough two folds and laminated it into 9 layers.
Wrap it in a plstic bag and return it to the fridge for 2 hours or overnight.
Remove from the fridge and repeat the last 4 steps above twice. You will then have 81 layers of dough.
Rest once more in the fridge for 2 hours, repeat the last 4 illustrated steps twice and you will have 729 layers of dough. Guess that's enough, huh?
Rest for another 2 hours in the fridge.
Now, it is finally time to shape your croissants. From now on, I had my camera :o)
Remove the dough from the fridge and wait a few minutes to allow it to soften a little.

Roll it out into a restangle until it is about 1/4 of an inch (5cm) thick.

Cut triangles with the help of a pizza cuter.

Make a small slit on the base of the triangle (this will help it keep the moon shape).

Roll up the triangles and curve them slightly into a crescent shape.
Arrange them in a baking pan lined with parchment paper or lightly greased.

Cover loosely with plastic and let it rest at room temperature for approximately 1 hour or until it doubles in volume.

Preheat the oven to 425°F (220°C). Brush the croissants with eggwash (1 egg beaten with 1 tsp water).


Bake for 15 to 20 minutes until they have puffed up and are golden brown.

Transfer to a cooling rack.

Enjoy! I did, immensely!

They look great!
ReplyDeleteThose look beautiful! And, I must say, I love your illustrations - they are great! :) You did a stunning job on these croissants.
ReplyDeleteLoved ur illustration a lot... Great great job on the challenge and i will bookmark this for future reference.. absolutely pro looking crossiants Renata :)
ReplyDeleteThe September challenge was lotsa fun. Wonder what the Daring Kitchen has in store for us in October!
ReplyDeleteWow they look amazing Renata. I suck at making that type of dough so I admire anyone that can. Can I have some of yours for breakfast lol?
ReplyDeleteRenata, your croissants are so flaky and crisp looking! I can see you are a professional at making croissants. What are your adaptions to the recipe? I notice a little less salt and longer cooking time - anything else? I'm going to make them again soon!
ReplyDeleteWOW the interior crumb is astounding so open and flaky yes I agree they look fabulous. I love the diagrams you did for the posting so clear. Bravo to you. Cheers from Audax in Sydney Australia.
ReplyDeleteLovely croissants - so golden and flaky!
ReplyDeleteYour croissants look just perfect, cute illustrations too :)
ReplyDeleteCongratulations dear! They're so pretty and perfect I don't know what to say. You're amazing. I' missing so much the challenges, this month I was so determined but croissants were too much for me. I don't have the time and finally I gave up but I regret it :-(
ReplyDeleteBig hug dear Renata!
Your croissants are beautiful! Nicely documented too. I kept forgetting to take pictures of the process.
ReplyDeleteBeautiful croissants! I love the tip to cut a small piece out of the bottom to keep the shape, I will have to give that a try next time.
ReplyDeleteLove the croissants, you made them very perfectly. delicious.
ReplyDeleteThat tray filled with perfectly golden, perfectly puffed, perfectly shaped croissants is such a beautiful sight! And your crumb is fabulous, so light and airy.
ReplyDeleteWhen I make croissants again, this is the page I will be consulting. Lovely presentation! Thanks for the step-by-step.
ReplyDeleteBeautiful croissants - the inside looks so light and airy! I also appreciated that there were no out-of-the-ordinary ingredients for this challenge ;) Love your chalk-board diagrams!
ReplyDeleteThose look beautiful! And I love your little chalkboard diagrams of the steps. Nice job on the challenge!
ReplyDeleteWow, lovely presentation (and the step-by-step drawings are adorable)!
ReplyDeleteYour croissants are fat, flaky and beautifully golden...I'm almost tempted to make another batch. :D
Hmmm...so odd, I tried to post yesterday, and it didn't show up. Trying again. Youe croissants are beautiful, love the interior shot of all those layers, and those chalkboard diagrams are fantastic!
ReplyDeleteThese look wonderful and such great illustrations!!
ReplyDeleteHi Reneta,
ReplyDeleteThe croissants look sooooo inviting. Ifi was there I'd probably finish the entire try by myself.they look for perfectly fluffy and flaky. Love them.
Cheers.
PS - your effort on illustrations for the steps is amazing.
Wow Renata, they look great and I'm sure they were very delicious too...excellent job for this month's challenge!
ReplyDeleteFantastic result! I made these earlier this year, using Julia child's recipe. I think once was enough for me due to the lengthy process.
ReplyDeleteI tried leaving a comment 5 times before with no luck
ReplyDeleteoutstanding work, photography and presentation Renata...
hats off to you
Beautiful croissants Renata! Bravo. I love the illustrations. And you are so right, they smell divine when they are baking.
ReplyDelete