

 |
| This month's Daring Bakers' Challenge took us on a trip to beautiful Brazil! Renata of "Testado, Provado & Aprovado!" taught us how to make Pao De Queijo, tasty cheese buns that make the perfect snack or treat, and that will make your taste buds samba! |
Escolhi o Pão de Queijo pois já ando vendo grande interesse por esta receita brasileiríssima nos sites gastronômicos internacionais. Fiz uma coletânea de receitas já apresentadas aqui no blog, adaptando as instruções para o desafio. Como desses desafios participam pessoas de todos os cantos do mundo, temia que o polvilho usado nas receitas pudesse ser difícil de ser encontrado em alguns locais, apesar da globalização estar facilitando, cada vez mais, os amantes da cozinha internacional. Sendo assim, forneci uma receita de "Falso Pão de Queijo", que também já havia passado por aqui, para que todos pudessem ter a chance de participar.
As receitas escolhidas para o desafio foram:

PÃO DE QUEIJO TRADICIONAL - Receita adaptada lá do "Eternos Prazeres" da querida amiga e Xará Renata Boechat, mineira que sabe tudo de pão de queijo!

PÃO DE QUEIJO RÁPIDO - Receita que tirei de um velho caderno de receitas que me acompanha há muitos anos. Bem conhecida dos brasileiros, feita no liquidificador e assada em forminhas individuais. A mesma receita usada para os "waffles de pão de queijo".

WAFFLES DE PÃO DE QUEIJO - Uma maneira diferente de usar a mesma massa do pão de queijo rápido.

FALSO PÃO DE QUEIJO - Receita adaptada lá do "Pecado da Gula" da querida Akemi que, como eu, viveu bom tempo no oriente e ficou com muita saudade do nosso pãozinho de queijo, tendo que improvisar com os ingredientes disponíveis.

PANINI DE PÃO DE QUEIJO - Sugestão para aproveitamento de sobras de pão de queijo. Este, inédito aqui no TP&A, dispensa receita e aceita sua deliciosa criatividade!
O desafio foi um sucesso! A grande maioria dos participantes conseguiu fazer a receita com resultados excelentes! Testaram, provaram e aprovaram os pãezinhos, declarando que pretendem repetir a receita mais vezes. Somente um ou outro não conseguiu encontrar o polvilho mas improvisou com o que tinha disponível. Parabéns a todos pela participação!
Abaixo transcrevo o desafio na forma original em que o apresentei para o site THE DARING KITCHEN (em inglês) onde podem ser encontrados, também, os resultados dos participantes.
~~~~~~~~~~~~~~~~~~~~~~~~~~~~~~~~~~~~~~~~
The Daring Bakers’ May, 2014 Challenge: PÃO DE QUEIJO
Introduction:
Hi, I'm Renata and I blog at "Testado, Provado & Aprovado!". I've been a member of The Daring Kitchen since April 2010. I have learned so much and I enjoy it immensely, so I'm honored to host this month's challenge! Hope you all enjoy it, too.
I'm Brazilian, so I decided to bring to you a recipe that is very popular in my country and is adored by almost everyone who tries it. I am personally addicted to it It is not sweet as most DB's challenges, but turning it into a sweet treat is a cinch! Please welcome Brazilians' beloved "PÃO DE QUEIJO"!
I'm Brazilian, so I decided to bring to you a recipe that is very popular in my country and is adored by almost everyone who tries it. I am personally addicted to it
It is not sweet as most DB's challenges, but turning it into a sweet treat is a cinch! Please welcome Brazilians' beloved "PÃO DE QUEIJO"!
Pão de Queijo ( Pão = Bread; Queijo = Cheese) is a non-yeasted bread, the main ingredient is not wheat flour instead it uses tapioca starch, but it is referred to as "bread". It dates back to the eighteenth century (I had to research that!) it became popular in the 1950's in Minas Gerais (a state of Brazil). You can find Pão de Queijo everywhere now in Brazil, from specialized snack bars that sell them hot out of the oven, to packages of frozen dough balls, sold in supermarkets, ready to bake at any minute in the comfort of your home. However, most Brazilians who like baking have a favorite recipe to make from scratch. I have tried a few dozen different recipes. Even if you stick to the same recipe, your Pão de Queijo may turn out slightly different each time, but always delicious! This is due to the quality of ingredients (tapioca starch varies from brand to brand) and type of cheese you use, don't be too concerned 'cause most cheeses will work fine.
Recipe Source:
Traditional Brazilian “Pão de Queijo”
People from the state of Minas Gerais (Brazil) are known as the best Pão de Queijo makers. Since I'm not from Minas Gerais, I adapted a recipe from a blogger friend of mine, who is! She is also called Renata, and she blogs at "Eternos Prazeres". Her recipe is the "authentic" recipe from Minas and I loved the results.
People from the state of Minas Gerais (Brazil) are known as the best Pão de Queijo makers. Since I'm not from Minas Gerais, I adapted a recipe from a blogger friend of mine, who is! She is also called Renata, and she blogs at "Eternos Prazeres". Her recipe is the "authentic" recipe from Minas and I loved the results.
Quick “Pão de Queijo”
The "quick" version is a recipe from an old recipe notebook of mine. It's an easier version, similar to a pancake batter and can be baked in muffin pans or cooked in waffle makers with very interesting results.
The "quick" version is a recipe from an old recipe notebook of mine. It's an easier version, similar to a pancake batter and can be baked in muffin pans or cooked in waffle makers with very interesting results.
“Fake Pão de Queijo”
The "fake" version was adapted from “Pecado da Gula”. I chose to include this recipe just in case you can't find the main ingredient (tapioca starch) in your area. Instead, potato starch is used, which is easier to find in other countries. The result is not exactly the same as the original, but a great substitute for me when I was half a world away from home!
The "fake" version was adapted from “Pecado da Gula”. I chose to include this recipe just in case you can't find the main ingredient (tapioca starch) in your area. Instead, potato starch is used, which is easier to find in other countries. The result is not exactly the same as the original, but a great substitute for me when I was half a world away from home!
Blog-checking lines: This month's Daring Bakers' Challenge took us on a trip to beautiful Brazil! Renata of "Testado, Provado & Aprovado!" taught us how to make Pao De Queijo, tasty cheese buns that make the perfect snack or treat, and that will make your taste buds samba!
Posting Date: May 27, 2014
DOWNLOAD THE PRINTABLE FILE HERE.
Notes:
ABOUT THE MAIN INGREDIENTS:
TAPIOCA STARCH (also known as CASSAVA STARCH) is the main ingredient of Pão de Queijo. Here in Brazil there are two types: REGULAR and SOUR. The regular type is easier to find in other countries, but if you are lucky enough to find the sour type in your area, I highly recommend you try it (quantities will be provided when applicable). It looks pretty much like any other starch, powdery and white, sometimes it has little granules.
You can find tapioca starch at amazon.com:
Regular Tapioca starch (tapioca flour)
Sour Tapioca Starch (this is a Brazilian brand, quite overpriced. Here in Brazil it costs around US$ 2!)
When I was living in South Korea, I could find Tapioca Starch at Foreigners' Markets.
You can find tapioca starch at amazon.com:
Regular Tapioca starch (tapioca flour)
Sour Tapioca Starch (this is a Brazilian brand, quite overpriced. Here in Brazil it costs around US$ 2!)
When I was living in South Korea, I could find Tapioca Starch at Foreigners' Markets.
CHEESE: The second most important ingredient. The authentic recipe calls for “Queijo Minas Curado” which is typical from Minas Gerais. It looks like this:


However, the recipes are usually very flexible. You can use almost any kind of cheese and it will still work and be delicious. You can be adventurous and use strong flavored cheeses if you want, but I recommend you start with a mild one so you get to know the original taste. When I was abroad I used Monterey Jack Cheese with excellent results; it is somewhat similar to the Brazilian cheese, taste and texture-wise.

If you are already familiar with Pão de Queijo, you can play around with your favorite cheeses and tell us about your results ;o)
TIPS:
- Pão de Queijo is gluten-free.
- Traditional Pão de Queijo should not brown too much in the oven. As it gets lightly golden, remove and serve hot/warm. The “quick” versions can get a little more tanned, specially the waffle.
- They should have a thin dry crust with a soft, slightly chewy, cheesy interior, full of air pockets.
- Pão de queijo should be served hot or warm. After they cool down, they lose their special texture, so bake only what you need. This is where frozen made ahead shaped dough comes in handy. If you still have left-overs, keep them in an air-tight container (max. 24 hours) and try making "Panini", you will not regret it!!
Mandatory Items:
I challenge you to make Brazilian "Pão de Queijo" using either one of the recipes provided or any other of your choice. If you want to be extra daring, feel free to create new flavors using different types of cheese and/or fill them with whatever suits your fancy, sweet or savory, or both! I'm sure by the end of the month I will have added many ideas to my "Pão de Queijo" addiction!
Variations allowed:
Pão de Queijo is not traditionally filled. As it became more and more popular, new recipes and their variations started to arise and, of course, people started having great ideas. One of them was to fill the raw dough with more cheese! Alternatively, if you have a sweet tooth, you can fill the baked dough with jam or dulce de leche, for example. They are easy to fill because they puff up while baking and usually have pockets of air begging to be filled with something delicious!
There is a famous snack bar specializing in Pão de queijo here in Brazil, which created the "Panini" made with Pão de Queijo. The original Italian Panini is a grilled sandwich that is made with other kinds of bread other than sliced bread, filled with cheese, ham, salami, etc. If you use leftover Pão de Queijo for that, the result will be fantastic!
There is a famous snack bar specializing in Pão de queijo here in Brazil, which created the "Panini" made with Pão de Queijo. The original Italian Panini is a grilled sandwich that is made with other kinds of bread other than sliced bread, filled with cheese, ham, salami, etc. If you use leftover Pão de Queijo for that, the result will be fantastic!


I'm sure you will come up with something delicious!
Preparation time:
Varies by recipe but it won't take much longer than 30 minutes to prepare the dough, maybe 10 to 15 minutes for shaping and 20 to 25 minutes baking.
Equipment required:
Large Bowl
Sauce pan
Baking sheets/pans
Sandwich maker (if you want to try Panini)
Sauce pan
Baking sheets/pans
Sandwich maker (if you want to try Panini)
TRADITIONAL PÃO DE QUEIJO
Servings:
Yields about 80 small balls
Servings:
Yields about 80 small balls
Ingredients:
500 gm (4 cups) tapioca starch (If you have access to sour tapioca, you can use 250gm (2 cups) of each)
1 cup (250 ml) whole milk
2-3/4 tablespoons (40 ml) (1½ oz) (40 gm) butter
1 teaspoon (5 ml) (3 gm) salt (or to taste depending on how salty your cheese is)
3 cups (750 ml) (9 oz) (250gm) Monterey Jack Cheese (or another cheese of your liking, or a mix of cheeses), coarsely grated
1 to 3 large eggs
1 cup (250 ml) whole milk
2-3/4 tablespoons (40 ml) (1½ oz) (40 gm) butter
1 teaspoon (5 ml) (3 gm) salt (or to taste depending on how salty your cheese is)
3 cups (750 ml) (9 oz) (250gm) Monterey Jack Cheese (or another cheese of your liking, or a mix of cheeses), coarsely grated
1 to 3 large eggs
Directions:
- Heat milk, butter, and salt in a small sauce pan until it comes to a boil. Watch closely as it may boil over. Remove from heat and set aside.
- Sift tapioca starch into a large bowl.
- Pour the boiled (hot) mixture over the tapioca and start stirring with a fork. The milk mixture will not be enough to form a dough yet. You will have a lumpy mixture, that's what it is supposed to be.

- Keep stirring with the fork, breaking down the lumps as much as you can, until the mixture cools down to warm.
- At this point, preheat your oven to moderately hot 400° F/200° C/gs mark 6
- Add the grated cheese to the tapioca mixture and mix well, now using your hands.
- Add one egg at a time, mix with your hands until dough comes together. I suggest you lightly beat the egg with a fork and add little bits until the dough comes together into a soft but pliable dough. You only have to knead it a bit, not as much as you knead a yeasted bread. It's OK if it is slightly sticky.
- You can find a link to a video of the process in “Additional Information” below.

- Form balls with the dough and place them on a baking sheet lined with parchment paper or silicon mat or lightly greased with vegetable oil. If necessary, you can oil your hands to make shaping easier. The size of the balls may vary from small bite-sized balls to the size of ping pong balls. They will puff up quite a bit after baking. I personally prefer the smaller ones.

- Bake for about 25 minutes or until they just start to brown on the bottom. You may have golden spots of cheese on the crust. Don't over-bake as they will get hard and bitter.

NOTE: If your dough gets too soft and sticky to shape balls, you can always add a bit more tapioca starch or pop the dough into a piping bag and pipe the dough on a baking sheet.


- Serve hot or warm. Brazilians love them with a cup of coffee! Yum...

“QUICK” PÃO DE QUEIJO
Servings:
Yields about 30 if made in small (2 tablespoons) 30 ml muffin cups
Servings:
Yields about 30 if made in small (2 tablespoons) 30 ml muffin cups
Ingredients:
2 large eggs
10 tablespoons (150 ml) whole milk
4 tablespoons (60 ml) (2 oz) (60 gm) butter, melted OR 60 ml vegetable oil (neutral tasting such as canola, grapeseed, etc)
1 teaspoon (5 ml) (3 gm) salt (or to taste, depending on the saltiness of your cheese)
1/2 cup (125 ml) (1-2/3 oz) (50 gm) good quality parmesan cheese such as parmigiano-reggiano, grated
2 cups (500 ml) (9 oz) (250 gm) tapioca starch (or 150 gm regular, 100 gm sour tapioca starch)
Directions:
- Preheat the oven to moderately hot 400°F/200°C/gas mark 6
- Prepare a muffin pan by lightly greasing it with vegetable oil. Alternatively, you may use silicone muffin cups which don't need any greasing.
- Place all ingredients, except tapioca starch, in the jar of your blender. Blend for a minute or so.
- With the blender still running, remove the little cap from the lid and add the tapioca flour by the spoonfuls.
- Once you have added all the starch and your batter is smooth, turn off the blender.
NOTE: Because tapioca starch may vary from brand to brand, you may need to add some extra milk if your batter starts to get too thick and difficult to blend. Alternatively, you can stop adding the starch when you get a somewhat thick, but still pourable batter, similar to waffle batter.
- Pour the batter into prepared muffin pans or silicone cups that have been arranged on a baking sheet.

- Place baking sheet in the pre-heated oven and bake at moderately hot 400°F/200°C/gas mark 6 for about 30 minutes or until puffed up and lightly browned.

- Serve warm.
NOTES:
I have tried two different size muffin cups. The larger one is 1/4 cup (60 ml) capacity (above) and the smaller, 2 tablespoons (30 ml) capacity (below). The smaller one was a much better result. If your muffin cups are too big, it would be a good idea to fill them only halfway.
I have tried two different size muffin cups. The larger one is 1/4 cup (60 ml) capacity (above) and the smaller, 2 tablespoons (30 ml) capacity (below). The smaller one was a much better result. If your muffin cups are too big, it would be a good idea to fill them only halfway.

- The same recipe can be used for making “Pão de Queijo Waffles”... delicious!

- Pour the same batter onto a pre-heated waffle iron....

- ….and cook until lightly golden.
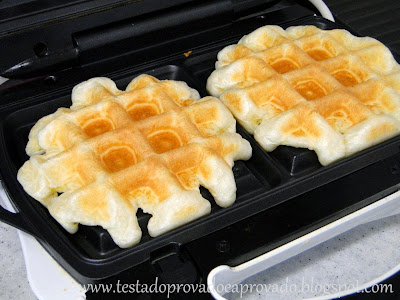
- Place the on a wire rack while you cook the others.

- Serve warm.
“FAKE” PÃO DE QUEIJO
Servings:
Yields about 15 small balls
Servings:
Yields about 15 small balls
Ingredients:
3 tablespoons PLUS 1 teaspoon (50ml) milk
3 tablespoons (45ml) water
1 tablespoon (15 ml) (1/2 oz) (15 gm) butter
2/3 cup (160 ml) (3-1/2 oz) (100 gm) potato starch
1/2 tsp (3 gm) baking powder
salt to taste
1/2 cup (125 ml) (1-2/3 oz) (50 gm) grated Parmesan (I used Parmigiano Reggiano)
1 large egg
3 tablespoons (45ml) water
1 tablespoon (15 ml) (1/2 oz) (15 gm) butter
2/3 cup (160 ml) (3-1/2 oz) (100 gm) potato starch
1/2 tsp (3 gm) baking powder
salt to taste
1/2 cup (125 ml) (1-2/3 oz) (50 gm) grated Parmesan (I used Parmigiano Reggiano)
1 large egg
Directions:
- The method for these is the same as for Traditional Pão de Queijo.
- Preheat oven to moderate 350°F/180°C/gas mark 4
- Boil the milk, water and butter together.
- In a bowl, sieve the starch, salt and baking powder.
- Pour the hot milk mixture over the starch and stir. It will be lumpy.
- Add the egg and cheese, stir until well combined.
- Make little balls with lightly oiled hands and arrange on a baking sheet lined with parchment paper.
- Bake in a preheated moderate oven (350°F/180°C/gas mark 4) until lightly golden, for about 20 minutes.
- Serve warm.

Storage & Freezing Instructions/Tips:
Pão de Queijo dough should be baked right away. If not baked right after making the dough, it can be frozen (raw) with excellent results. All you have to do is shape the balls of dough to the desired size and place them side by side, but not touching, on a plate or baking sheet lined with a food-safe plastic bag (you can use this same bag to pack them after frozen).

Place it in the freezer for a few hours until hard. Remove from the freezer and place them in a food-safe plastic bag or ziplock bag and return to the freezer for later use. When you want to bake them, just pull out as many as you wish and arrange them on a very lightly greased baking sheet (or lined with parchment paper or silicone mat), about a couple inches apart and bake as directed. The dough balls can go straight from the freezer to the oven with perfect results!
I have never tried freezing the “quick” version, raw. I don't think there will be any problems doing so, but I also think it wouldn't be practical. They do freeze well after cooked though. To reheat, just place them in a moderate oven for a few minutes.
The “waffle” kind can be frozen after cooked and stored in plastic bags right after they cool down. When you want to serve, they can go straight from the freezer to a toaster, just be careful so that they don't brown too much.
Additional Information:
This recipe doesn't require a stand mixer and, traditionally, it is made by hand. However, it is indeed sort of a “heavy” dough. Though I have never tried using a stand mixer here, I found someone who has. Her name is Raiza Costa and she blogs at Dulce Delight. She's a Brazilian living in the US and she makes lovely videos in English. I thought I'd share her “Pão de Queijo” post (with video) with you:
Another link to a video showing the process by hand. It's in Portuguese but the method is clearly shown:
Disclaimer:
The Daring Kitchen and its members in no way suggest we are medical professionals and therefore are NOT responsible for any error in reporting of “alternate baking/cooking”. If you have issues with digesting gluten, then it is YOUR responsibility to research the ingredient before using it. If you have allergies, it is YOUR responsibility to make sure any ingredient in a recipe will not adversely affect you. If you are lactose intolerant, it is YOUR responsibility to make sure any ingredient in a recipe will not adversely affect you. If you are vegetarian or vegan, it is YOUR responsibility to make sure any ingredient in a recipe will not adversely affect you. The responsibility is YOURS regardless of what health issue you’re dealing with. Please consult your physician with any questions before using an ingredient you are not familiar with. Thank you! 

Olá Renata! Muito obrigada pelo desafio, adorei a sua escolha. As opções variadas permitem que qualquer um experimente. Parabéns.
ReplyDeleteOlá Renata querida, saudades de vc, andei meio sumida por causa das minhas costas, que melhora e piora no mesmo mês, coisas de idade kkkk. Adorei essa seleção de pães de queijo, uma mais gostosa que outra, e parecem bem fáceis de fazer. Anotei algumas que me interessaram muito. Ficaram todas lindas e apetitosas. Beijinhos uma linda semana
ReplyDeleteMinha mãe ama pão de queijo, eu também gosto, mas ela é louca por tudo que vai queijo!!! Ela vai amar essas receitas.
ReplyDeleteBjos.
Ah, que legal Xará!
ReplyDeletePuxa, que ideia tão legal a sua, pães de queijo super brasileiros sendo reproduzidos mundo afora,
Os paninni ficaram show, vou levando sua ideia...rsss
Agradeço o seu carinho, e deixo aqui meus parabéns pela iniciativa,
Abraço grande,
Renata
Excellent challenge this month--thanks so much :)
ReplyDeleteQuerida Renata,
ReplyDeleteÉ tão bom vê-la por aqui! Sempre com delícias para nós! Essa "seleção" de pães de queijo está uma tentação e me chamando para ir para a cozinha.
Bj,
Lylia
Thanks so very much for hosting this challenge!! I had made these a few years ago and was not sure of how they turned out. It was nice to make as a group with so much feedback. I only wish I could find the sour tapioca starch in Canada.....and I wish I could take a trip to Brazil to taste them properly:)
ReplyDeleteOlá Renata, thank you for the great Challenge! Never worked before with tapioca starch, but with your explanation my Pão de Queijo turned out great! Thank you for the inspiration!
ReplyDeleteTia, adorei esse desafio! Eu amo pão de queijo e sempre falo pro Luis que se um dia a gente morar fora eu vou importar polvilho aos montes rsrs! É engraçado que qdo a gente viaja eu nunca sinto falta de comida nenhuma (tipo arroz feijão) mas chego louca pra comer pão de queijo... Acho que nós deveriamos montar uma banquinha de pão de queijo em Copacabana agora na copa! Topa? rsrsrsrs
ReplyDeleteBeijao
Renata, I´d like to thank you for the challenge too, it was very tasty, quite easy and I had a lot of fun! Surely I will remake these delicious buns soon ;)
ReplyDeleteQuerida Renata! Muitas saudades mesmo! Espero que esteja tudo bem com vc e que agora já esteja devidamente instalada na nova morada!
ReplyDeleteMenina, adorei a sua ideia do pão de queijo! Até mesmo em algumas padarias do Japão já vendem esta iguaria mineira e acho que não tem um que não se rende ao sabor e textura sem igual dele!
Muito obrigada por incluir uma receitinha do PG na sua lista! Fiquei imensamente honrada! :)
Adoraria ver o resultado dos blogueiros que participaram do desafio! Como faço para ver?
Bjss e obrigada pelo carinho de sempre!
Oi Akemi, bom te ver por aqui! A honra foi toda minha! O resultado ( somente fotos em um slide show) você pode conferir nesse link:
Deletehttp://thedaringkitchen.com/recipe/pao-de-queijo
bjsss
Achei muito chique você lançando o desafio!!! E vou fazer essa receita já!
ReplyDeleteThank you so much Renata for an amazing challenge. Everyone in my house loved them so much and they are demanding a remake!
ReplyDeleteThank you for being the wonderfully talented and supportive person you are
Oi, Re,
ReplyDeleteUltimamente eu tenho tido pouco tempo para a Internet e o meu próprio blog tem sofrido com isso, rsrs.
Mesmo assim entrei aqui outro dia, para me inteirar sobre o Maftoul, do post anterior, e não consegui
comentar, porque o meu computador está muito lento, às vezes demora um tempão 'conectando' com as páginas e eu acabo tendo que desistir. Mas eu só quero mandá-lo novamente para o técnico depois de expurgar uns tantos arquivos de fotos que acumulei, e o tempo também tem sido insuficiente para tanto, rsrs.
Bem, que legal a sua proposta para o desafio, como mineira eu sou fã de pão de queijo. Também
gosto muito de ver a culinária brasileira ganhando o mundo, acho a nossa cozinha muito rica e saborosa.
O seu post ficou o máximo, muito informativo e apresentou todas as possibilidades ligadas ao pão de queijo.
Eu ainda não fiz o falso pão de queijo, vou salvar a sua receita.
Um beijo!
Thanks for wonderful Challenge my friend, I enjoyed making them. This is new snack in my house now. I have been planning for long time, but never made it, finally with your recipe I made it.
ReplyDeleteLOVED these Renata! So delicious and easy to make. Can't wait to make these again
ReplyDeleteSandie
thank you again for such a great challenge!
ReplyDeleteRenata, thank you so much for introducing me to these little cheesy bites of deliciousness! And thank you for being such an awesome host!! What a delicious month! :)
ReplyDeleteThank you for a lovely challenge, Renata. I couldn't make the "real deal" because I don't get tapioca flour or potato starch here, but even the "fake" Pao de Queijo were quite good.
ReplyDeleteRenata, these all look so good I don't know where to start! Maybe with the paninis and savories, then something sweet.
ReplyDeleteQuerida Renata
ReplyDeleteAunque un poco tarde acabo de publicar el reto, NO ME LO PODÏA PERDER, estuvo exquisito!!!!, gracias por compartir tu receta y todas las pruebas que hiciste para nosotros, eres una toda una profesional!!!!, un beso
Great challenge, Renata! Thank you!
ReplyDeleteHi Renata! Thanks for this great challenge! I really enjoyed it because it was tasty but simple! My dad passed away a month ago after a challenging few years will dementia which is why I have been away for so long. This was a great recipe to get back into DB's! Blessing to you and your family!
ReplyDeleteI loved this challenge Renata! Thanks for hosting :)
ReplyDeleteAmo tudo que leva maçã no preparo. Que delicia de blog, já estou seguindo.
ReplyDeleteBjs
http://cacau-aquiemcasa.blogspot.com.br/